1. Open Hitfilm
2. Click “New”

3. Click “Start Compositing”


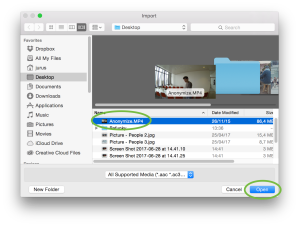
4. Click “Import”, select the file you want to anonymize/censor and click “Open”


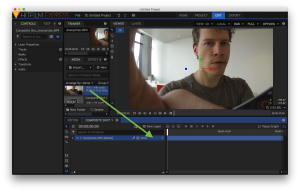
5. Click and drag the clip into the timeline
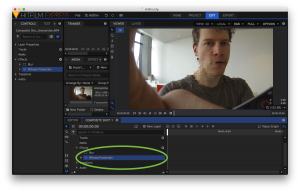
6. Go to “Effect” and hover over the + icon. Go to “Distort” and click on “Witness Protection”

7. Expand the “Witness Protection” tab

8. Under “Shape” you can adjust the size of the pixelation mask. Once you have the right shape you can click in the circle next to “Scale X and Y” to set a keyframe.
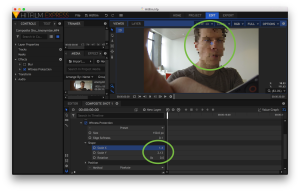

9. If you click and hold on the mask in the preview you can move the mask in the right position over the face. Once the mask is in position click on the circle under “Position” next to “Center” to set the first keyframe.

10. Click the “Next Frame” button until the mask does not cover the face anymore. Now move the mask in the preview area so the mask covers the face again.


11. Once you moved the mask you should get new keyframe icons in the timeline.
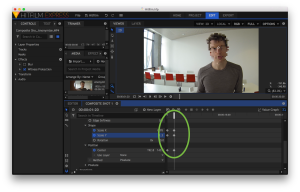
12. Click “Next frame” again, adjust the mask when necessary and check that after you moved a new keyframe icon appears in the timeline. Repeat this process until you reach the end of the video. !! If a new keyframe is not added after you move the mask or adjust the shape of the mask, click on the circle next to “Scale X/Y” and “Center”. It should be blue with a dot in the middle!!


13. Save the project by clicking “File” and “Save As”. Select the destination, give the project a name and click save. (This does not export the video.)


14. Export the video: Right click on “Composition Shot”, go to “Export” and click “Export Contents”

15. If a new window opens, click “Go to Export”

16. On the right side you can select the format you want to export the video file in. If you click on the destination below output (in the middle) you can change where to save the video.


17. Click “Start Exporting” and wait. Do not switch tabs during the export process.


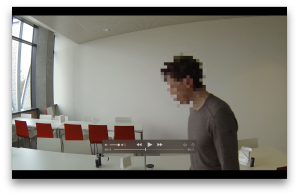
Done. (This is an image of the final result)